How does Additive Manufacturing works?
It all starts with a 3D model, create one yourself or download it from a 3D repository. When creating it yourself you can choose to use a 3D scanner, app, haptic device, code or 3D modeling software. Objects are digitally defined by computer-aided-design (CAD) software that is used to create .stl files that essentially “slice” the object into ultra-thin layers. This information guides the path of a nozzle or print head as it precisely deposits material upon the preceding layer and a laser or electron beam selectively melts or partially melts in a bed of powdered material. As materials cool or are cured, they fuse together to form a three-dimensional object.
Steps involved in 3D Printing
Step One: Creation
First in 3D Printing is to create a blueprint slash three-dimensional digital file of the object we want to print. The most common way of creating a digital model is with Computer Aided Design – CAD. However, there is a large range of professional and entry level software’s that can produce a file suitable for 3D Printing.
- DESIGN:You can use 3D modeling software like Blender, SketchUp, AutoCAD, SolidWorks, Maya, Photoshop, Thinker Cad or others to create your own designs. Almost any 3D modeling software can be used to create a 3D printable file.
- SCAN:Another way to create a three-dimensional digital file is through 3D scanning. 3D scanning is a technology, closely related to 3D printing, that analyses a real-world object and instantly creates a digital replica. 3D Scanning is widely used for reverse engineering tasks from industry professionals. Once an existing object is digitized, we also have the option to modify it before printing. A 3D scanner is needed for this process.
- DOWNLOAD: If you have minimal patience and just want to go ahead and print something, you can visit websites like Thingivers, YouMagine, CrabCad, and My Mini factory , Shapeways to download or buy files that other users have modelled. These files are 3d Print ready in most cases!
Lastly, there are several design requirements the 3D files have to meet before sending them to the printer. When designing for Additive Manufacturing (3D Printing), we need to keep in mind that we are design for the real world. Those are things like proper scale-size, minimum wall thickness, manifold/watertight just to name few, which we are going to take a deeper look a bit latter.
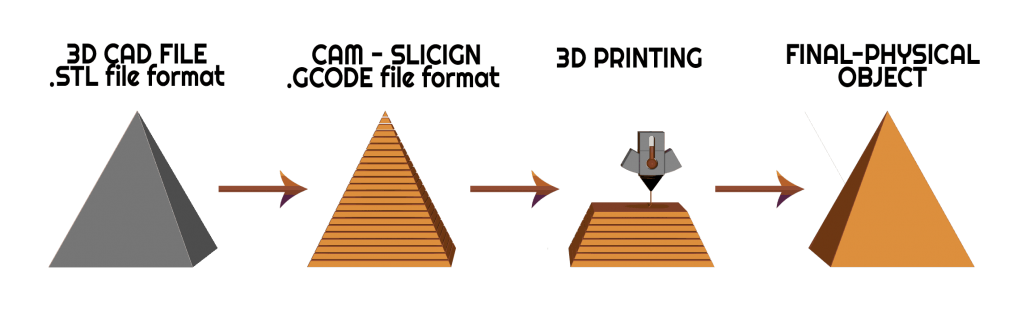
- Step Two: STL
Once you have a finished the CAD design, it is time to send it to the printer. First, we need to convert it into an appropriate file format. The most common 3D Printing file format is called STL, that stands for STereoLithography, and named after the first ever 3D printing process. STL has several other meanings such as “Standard Triangle Language” and “Standard Tessellation Language”. What is important to remember here is that STL is the usable file extension.
This file format includes triangular mesh (polygons), the data that describes the layout/surface of a three-dimensional object. Alternatives to STL are .OBJ and .3MF. Keep in mind that all those file formats don’t contain colour information. For 3D printing in full colour, you need to use file formats like .X3D, .WRL, .DAE, .PLY
An important note here is not every STL or OBJ file is 3D printable by default. The file formats have to meet certain criteria like a maximum polygon count, water-tightness, proper physical size, minimum wall thickness etc. In short, they have to be designed with 3D printing in mind!
- Step Three: Slicing
This is the process of translating the 3D File into instructions for the 3D printer to follow. Yep, that’s the fun part and you need a special software to do only that! Basically, Slicing is dividing or chopping the 3D model into hundreds or thousands of horizontal layers, telling the machine exactly what to do step by step. After the files are Sliced, a new file format is generated called G-code, with the file extension .gcode. G-code is the most widely used numerical code programming language, mainly used in computer-aided manufacturing to control automated machine tools like 3D Printers and CNCs (Computer Numerical Controls). In a nutshell G-code is the language of the machine and what we use to communicate with it!
If you own a 3D printer you will have to do it yourself. There are a lot of setting you can adjust to get the best result out of the printer. Good news is – No coding is required at all.
- Step Four: Printing
The printing machines are made of many moving and intricate parts, and they demand correct maintenance and calibration to produce successful prints. Most 3D Printers do not need to be monitored after the printing starts. The machine will follow the automated G-code instructions, so as long as there is no software error or the machine doesn’t run out of raw material, there should not be an issue during the printing process. - Step Five: Removal
Removing the finished parts from the printer will vary for different 3D printing technologies. In some case, like for Desktop machines it is as simple as separating the print from the build platform. For some industrial 3D printers, the removal of a part is a technical process that requires professional skills and specialized equipment within a controlled environment. - Step Six: Post-Processing
Again, post-processing of 3D printed parts will vary with 3D printing technologies and the materials the parts were printed with. Some 3D printing technologies let us handle the finished parts right away, while other technologies require additional steps to finish the fabrication process. Post-processing is an important step for the aesthetic and function of the parts.
In the majority of cases 3D printed parts are rough and do not have finished feel but can be vastly improved with the right techniques and craftsmanship. Through sanding, painting, polishing, and other post-processing methods, printed parts can accurately become a real-world model of the initial concept. Where not aesthetics is involved, but the mechanical properties are the main goal various industrial process may take place. Post-processing can be critical and time-consuming operation, but as the technology evolves, the automation of those steps follows.